Tuesday 25 June 2013

How to adjust Table of Contents (TOC) Page Margin in MS Word

A table of contents (TOC) in MS Word is a useful tool that helps to easily navigate a document. It is especially useful when writing books and ebooks. However, if you have ever tried to adjust the page margin, then you know how problematic it can be; I am referring to the specific situation where you want to adjust the page margins of your table of contents but you don't want to change the margins in the rest of the document. This may become necessary if you find that your TOC page numbers are too far aligned to the right such that when the document is printed, the page numbers appear too close to the ebook/book margin.

One way to remedy this is to adjust the margins on the entire document as the Word 2010 example below shows. 


However, this may end up increasing the page count significantly, which may end up as a disadvantage especially when you intend to publish the book. A higher page count translates to higher printing costs, thus, the above fix may not work for you.
The best solution is to adjust the margins of the table of contents without affecting the rest of the document. This is how to do it.

Step 1 - Navigate to the "View" tab and select "Outline" view.
Step 2 - Create section breaks at the top and bottom of your table of contents. In essence, you want to confine your TOC to a different section so that you can adjust the page margins in this section without affecting the rest of the document. Navigate to the "Page Layout" tab. Place your cursor at the point just above the table of contents title. In the "Breaks" drop down menu, click on "Next Page" as shown below.


Again, place your cursor at the end of your table of contents in Outline View and create a section break as described above. You should end up with section breaks above and below your TOC as shown below.


Step 3 - Close the Outline view and return to Print Layout view. Click anywhere on the table of contents page then navigate to the "Page Layout" tab. Adjust your page margins normally. If the TOC page numbers were too far aligned to the right, adjust the "Right" margin to your satisfaction. Ensure that the "Apply to" field is set to "This Section". This is very important because failure to do so will effect changes to the entire document. See below.


Click "OK" and check to confirm that the page margin changes have only been effected on the table of contents...and that's it!

Also learn how to create a clickable table of contents.

Thursday 20 June 2013

How to use the MS Word (2007 and 2010) Styles Feature

Microsoft Word has a couple of nifty tools that save you lots of time when writing and editing documents. One of these features is the Styles feature.  This article details how to use styles in Microsoft Word 2007 and 2010. The simplest way to format your MS Word documents is by making use of the inbuilt predefined styles. On your Home tab there are a number of styles listed. You should have something similar to the image below:


Below is some sample text for the purposes of this tutorial. We want to format this text and as you can see, the default style is the Normal style.


The first thing that you would want to do is to change the headings so that they stand out from the rest of the text.  Select each of the headings on your document and click on ‘Heading 1’ option on the tab. You should then end up with text as shown below:


As you can see the heading ‘Post’ stands out from the rest of the text in the document.
Let’s say for some reason you need to change the color of your heading to red. Right click on the tab you used to set the Heading styles as shown below:


Click on the ‘Modify’ option and change the settings to your preferences and then click ‘OK’.

You should then end up with text as shown below:


As you can see, we have changed the color of the heading from blue to red. It really is that simple!
Now that you know how to format your headings, let’s look at how to format the main text in your document. Let’s say you want to italicize the main body text and change the font color to blue. Here is how to do it:
On the ‘Styles’ tab, click on the ‘Modify’ option as shown in the earlier example. Right click on the option ‘Normal’ and select your preferred formatting you will end up with something like this:


As you can see it’s all quite easy to do and saves you a lot of time having to go back and format every small detail in your word document.


What is the importance of the styles feature?

MS Word Styles improve the appearance of your document and make it more appealing to your readers in the following ways:

  • Headings in a different font from the rest of the text
  • Indented bulleted lists
  • Adequate white space separating paragraphs
  • Emphasized text in a contrasting color.
  • Styles also save you lots of time.
  • It is easy to identify important aspects of a document that has been formatted using styles; a reader is able to quickly navigate a document.
  • Styles also give your documents a professional look.


Thursday 30 May 2013

Drop Cap in Word 2010 doesn't Work

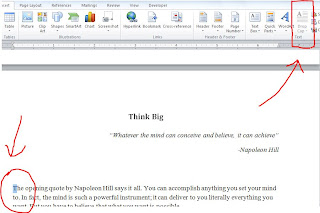
This post will teach you how to correct the error where drop cap in Word 2010 doesn't work. For some strange reason you may find that you are completely unable to make a letter at the beginning of a paragraph drop cap. This may be despite the fact that you have been editing a document and everything has been moving along smoothly. In most cases, its quite a simple problem with a fast remedy as outlined below.


This is how your document probably looks when you try to drop cap


Step 1 - In your 'paragraph' ribbon, click on the icon that show/hides hidden symbols and paragraph formatting as shown below. 


Step 2 - Delete the little "arrow" as shown above so that your document now looks like the document below.


Step 3 - Voila! that's it. Highlight the first letter in your paragraph and you will notice the drop cap option is now available in your 'text' ribbon within the 'insert' tab as shown below. 


Its as simple as that ... glad to help.

Sunday 27 January 2013

PowerPoint Won’t Open – Recover File


PowerPoint is one of the most useful of the Office suite of software offerings. Versatile and accessible, it is responsible for great presentations, and some excellent management of information flow. However, like all software titles, it does suffer from the odd problem. One of the biggest issues literally freezes the work that is being done. This is when PowerPoint simply does not open. Unfortunately, for many people this creates a bit of a brick wall, as they don’t have the technical knowledge to help them deal with such an issue. One of the biggest issues is with older PowerPoint files. When working with PowerPoint 2010, for example, sometimes older files simply refuse to open, leaving you in trouble if you are about to start your presentation. If this is the case, and an older file is not working in PowerPoint 2010, then there is a simple solution that should solve it quite easily.

 Open the problem file in the original version of PowerPoint that the file was first created on (PowerPoint 2007 for example). Then rename that file in the 2007 version. Then, all you have to do is convert them to the kind of file that you need (in this case PowerPoint 2010). If the files are even older, perhaps even stretching back to version 3.0, there is still hope there. These will not open readily by any means, but there are solutions at hand. The reason for these older files failing to open is something else. Microsoft is justifiably proud of PowerPoint because nearly everyone uses it. In fact, it is estimated that over 1 billion people currently have it installed on their computer. But when it released a service pack in 2003 it disabled older versions of PowerPoint, making the files created on any version older than 2003. This was an incredibly strange thing to do, and it lost Microsoft a number of fans. Thankfully, some enterprising developers have brought out PowerPoint convertor software that makes it easy to take the old files and convert them into something that can be used on PowerPoint 2003 upwards. There are a number of companies that provide this kind of software.


The old PowerPoint Error Code 108

 This error message has been routinely frustrating PowerPoint users for years. This error message sometimes flashes up when you find yourself unable to open a presentation. It generally means that the file has some kind of protection attached to it that prevents it from being opened. It is easily fixable. We will take a look at how you can fix it if you are using PowerPoint 2010. Generally speaking, this error message occurs because the file you are trying to open has some kind of password protection attached to it. You can solve this by:

1.      Opening up the presentation in the version of the software it was first created in, and then typing the password.
2.      Click the File tab, then the Info tab, and then click Protect Presentation. Once you have done this, you can then click on Encrypt with Password.
3.      In the Encrypt Document dialog box that appears, delete any password text and then click on OK.
 

This will solve the problem if you get that dreaded 108-error message. 


The dreaded email attachment 

You may find that you get the following error message when you try to open up PowerPoint: PowerPoint cannot open the type of file represented by filename.ppt.’ One reason for this may be that you were sent the file as an email attachment. While email is incredibly convenient and quick, it doesn’t take too kindly to PowerPoint sometimes. The email may have been corrupted as it made it’s way to you through cyberspace. This does happen more often than you think. To combat this problem, you just need to talk to the sender. Ask them to re-send the file as a zipped file. You can do this through Microsoft’s own zip utility or you can use a piece of software like WinZip. Once they have zipped the file all they have to do then is resend it to you. 

Problems with fonts

 This happens more often than not, and it often happens to people who have put together presentations time and time again. They load up their computer, ensure that the cables are in place, and the people are in the room and then they check out the screen. The fonts are different to what you originally had; this is a real problem because having different fonts makes it much harder to get your point across. The fonts were part of the point and helped with the message. What do you do? Well, you need to think about the fact that you are probably not using your own laptop to make the presentation. This happens when you have a job interview, for example. If this is the case, the solution is easy. You need to make sure that your presentation has the fonts embedded. Otherwise, the new laptop will override your fonts in favor of its own. Open up the dialog options box and get to work. Click on PowerPoint options and then click Embed Fonts.


The screen goes black 


This is a simple one. The usual reason for the screen going black is the fact that the screensaver setting is not appropriate for your level of usage. So you may have a presentation that runs for ten minutes with a screensaver setting that means your screen goes black at five minutes. Simple, yes, but it happens to a lot of people, and is the reason for many presentations falling rather flat.  So, there we have some PowerPoint problems and how to solve them. As you can see, most of them are very simple and don’t require anything other than a rational approach to problem solving and good basic knowledge as to how PowerPoint works. It is always worth consulting the instruction manual before you make any major changes to the way the software works. If you feel that you have hit a wall with problems like these, Microsoft has an outstanding support system, which you can access by hitting the F1 key on your keyboard. 

If you are having much more serious problems with your PowerPoint, then you should consider getting Free Powerpoint Recovery Software.


Facebook